
MP3 4me
15 years behind the iPOD
 Yet another DIY MP3 player
Project overview
Suspend your disbelief. I’m once again at least 15 years behind the times with this project - a DIY MP3 player. I have always thought it would be kind of neat to see if I could hack together one of these as so many others have done.
Turned out to have a few challenges on the AVR ATMega’s that I always use - but nothing insurmountable. It was very software-centric, since much of the hardware work was done with one or two chips.
My goal was to make it portable and small form factor, with a reasonably long battery life, an SD-card interface and a decent user interface - all with the ATMega328 8 bit microcontroller. I think I got there.
 Good, fast and cheap … pick one? Well, it was cheap.
S.T.E.M.
There is plenty of technology I had to work my way through - battery charger circuitry, MP3 audio specification, embedded file systems and SD cards - but the most interesting thing here is that the MP3 player is a system. All of the stuff needs to work together really well, or the user experience is a stinker. And even if you do get it all right, it can still be a loser.
And of course, the deficiencies in what I built are all the more visible since everyone else around me just uses their phone to play music. And phones are getting better every couple of months. So you really have to think about every detail if you want to see it through and come out with something that will last for more than 10 minutes.
Turns out, software is the way to hold it all together, and this one was pretty software intensive.
But I’m so far behind the state-of-the-art, lets dispense with the S.T.E.M. soapbox on this project and just build.
Hardware
Codec VS1053B
OK, so almost all of the hard work is actually done here by a single chip, the VLSI solutions VS1053b.
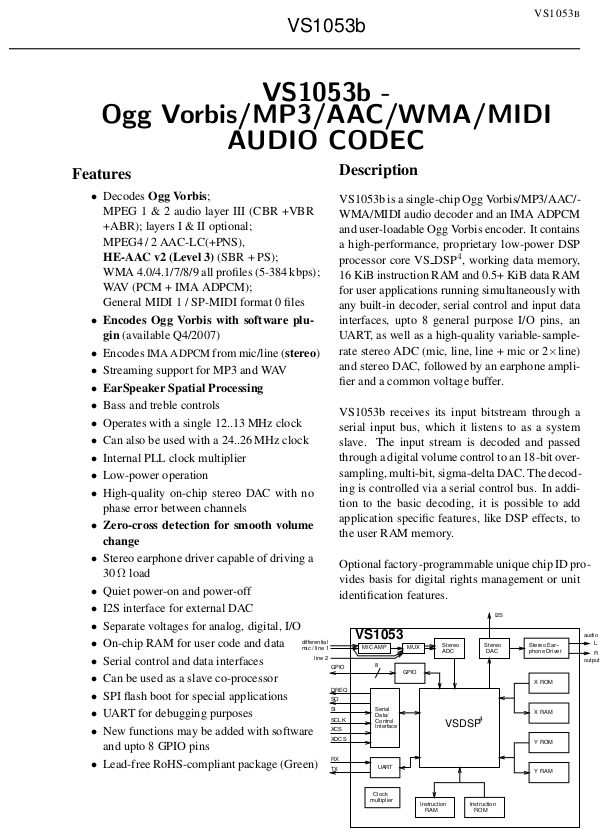 About 80 pages. OK, we’ll start with page 1
It is a decoder for many audio types, with a ton of functionality:
- Ogg Vorbis
- MP3 = MPEG 1 & 2 audio layer III (CBR+VBR+ABR)
- MP1 & MP2 = MPEG 1 & 2 audio layers I & II optional
- MPEG4 / 2 AAC-LC(+PNS), HE-AAC v2 (Level 3) (SBR + PS)
- WMA4.0/4.1/7/8/9 all profiles (5-384 kbps)
- FLAC lossless audio with software plugin (upto 24 bits, 48 kHz)
- WAV (PCM + IMA ADPCM)
- General MIDI 1 / SP-MIDI format 0
and can also stream. Streaming means it can take a digital audio stream encoded in an MP3 file and convert it “on the fly” to analog audio. I bought it already integrated on a board by a company called GEEEtech:
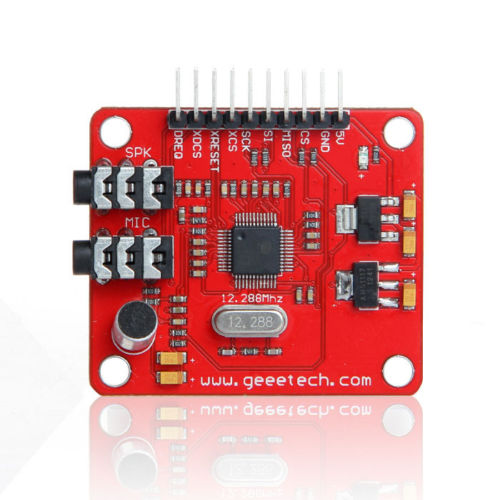 You can get one of these for about 15 bucks … some Assembly (and C) required
The feature list was good, but I hadn’t really given any of this much thought at all when I started out.
- SPI interface to VS1053b & the control signal lines are led out
- A headphone and stereo output
- A line_in input interface
- Power indicator
- 3.3V and 2.8V of LDO chip AMS-1117 on board, provides up to 800mA current
- A single power supply: +5 VDC
- 12.288 Mhz crystal
- SD card slot
Except for the single 5V power supply feature - which we’ll come to in a minute. There was not much to go by, just this website. But it was more than enough to get me started. In fact, they had a little example Arduino project posted there, which was fun to play with to just make sure the board worked. Mine did.
 As usual, the Arduino community has it all covered
We’ll come back to this “test” project in a minute. I didn’t appreciate until later just what it takes to embed a fully working file system for SD cards.
Circuit diagram
Here is the circuit diagram for the MP3 player. The GEEEtech board takes care of the VS1053b mounting, otherwise the schematic would be a bit more gnarly.
 No pin left behind
SD cards & interfaces
SD cards are an easy way to store the audio files. But how do you access those files? Well, SD card slot was populated on the back side of the GEEEtech board, so it was really a matter of figuring out how to access it in software. I didn’t have to hack my own interface on this one. The standard pinout for an SD card for accessing with the serial peripheral interface (SPI) looks like this:
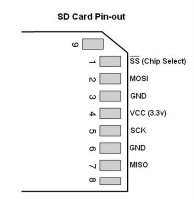 Accessing SD card with SPI.
Good news is that an SPI interface is also built into the ATMega328. So, software aside, I just needed to figure out how to package things so the SD card could easily be inserted, but also be out of the way. Answer? Tuck it in back.
 SD slot is in the back
Battery Charger & LiPO batteries
So how do you do the power management? After staring at this thing for awhile, I realized that - except for the codec board, everything else could work off of 3.3V. And in fact, I realized that even that daughter board used 5V not because the chip needed it, but because it was using it to make 3.3V and 2.5V. Now things clicked.
Why?
- I knew a 1 cell LiPO battery typically works between 3.65V (discharged) and 4.2V (fully charged)
- I also knew a “low drop out regulator (LDO)” for these voltage levels can stabilize an output voltage with as little as 0.2 to 0.3V overhead. And 3.3V + 0.3V = 3.6V, which is less that the lowest voltage on a 1 cell LiPO.
Bottom line, we can get away with a 1 cell LiPO circuit for the entire thing, with this hack to the GEEEtech board using an LP2966:
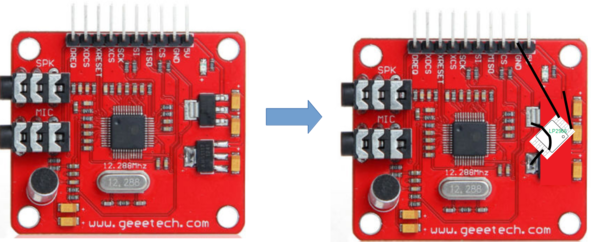 Just a bit of minor surgery required here
Remembering that the 5V input pin is now a 3.7V (nominal) input pin from the battery. And that simplifies life. Game on.
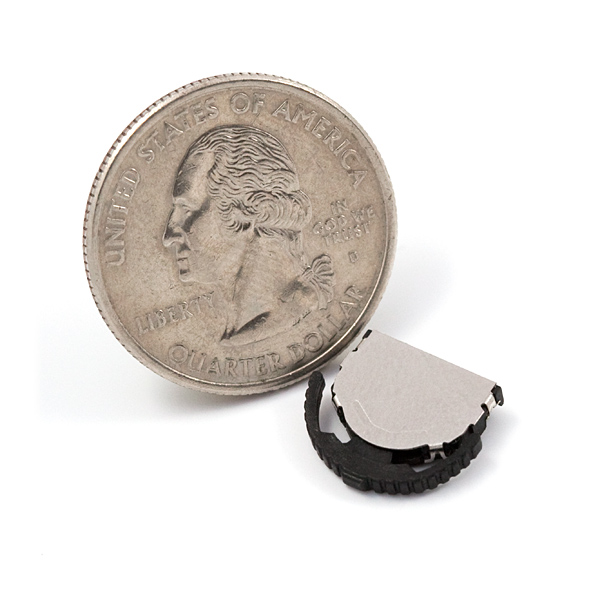
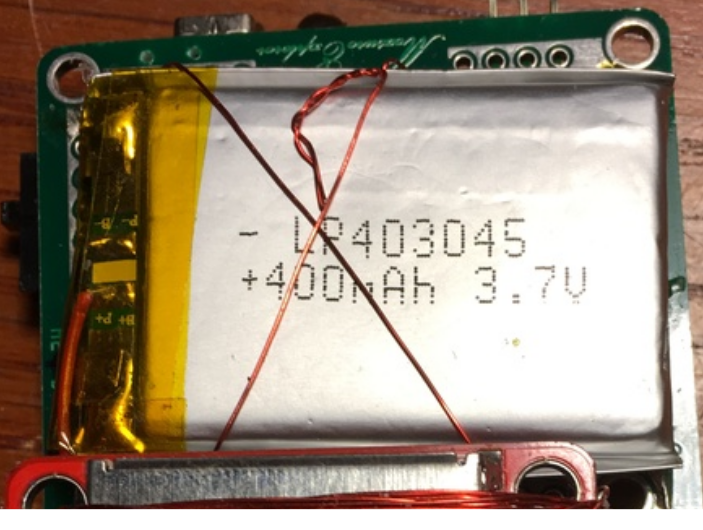 A 400mAh backpack
I found a really cool little IC (BQ2057 from TI) which is a charging IC for LiPOs.
There is a also a little protection circuitry (MN1382) for the LIPO which open circuits the battery if the voltage falls below a pre-set threshold.
The system is able to charge the battery even if the main power is off. The on/off switch drives a p-channel mosfet pass transistor.
I used a Mini-B USB connector as they are pretty popular in wall-warts which supply 5-ish volts.
 USB connector pinout
Battery Management
I added a little feature to measure the battery voltage and alert the user when it is getting low. As simple as comparing the battery voltage to a reference using one of the ADC inputs. I had to put a little calibration table together to make sure it was an accurate representation.
if (CmdVoltage ==1) {
  AverageVoltCount++;
  TranslateVoltage += (DWORD) MeasuredVoltage;
  CmdVoltage =0;
  if (AverageVoltCount > 9) {
    TranslateVoltage = TranslateVoltage/10;
    TranslateVoltage = (DWORD)500*TranslateVoltage;
    TranslateVoltage = TranslateVoltage/775;
    MeasuredVoltage = (WORD) TranslateVoltage;
    if (MeasuredVoltage > 1000) MeasuredVoltage = 999;
    XXX = MeasuredVoltage/100;
    YYY = MeasuredVoltage - 100*XXX;
    ZZZ = YYY/10;
    AAA = YYY-10*ZZZ;
    lcd_goto_xy(14,6);
    fprintf_P(&lcd_out,PSTR("%d.%d%d"),XXX,ZZZ,AAA);
    AverageVoltCount = 0;
    TranslateVoltage = 0;
  }
}
if (CmdVoltage1 ==1) {
  invert = 1;
  lcd_goto_xy(1,5);
  fprintf_P(&lcd_out,PSTR("LOW BATTERY"));
  invert = 0;
  CmdVoltage1 =0;
  CountVoltage = 0;
}
Here is what the voltage of the battery did as a function of playing time for a battery that was in use for about 6 months. Not too bad for not doing a serious job of power management.
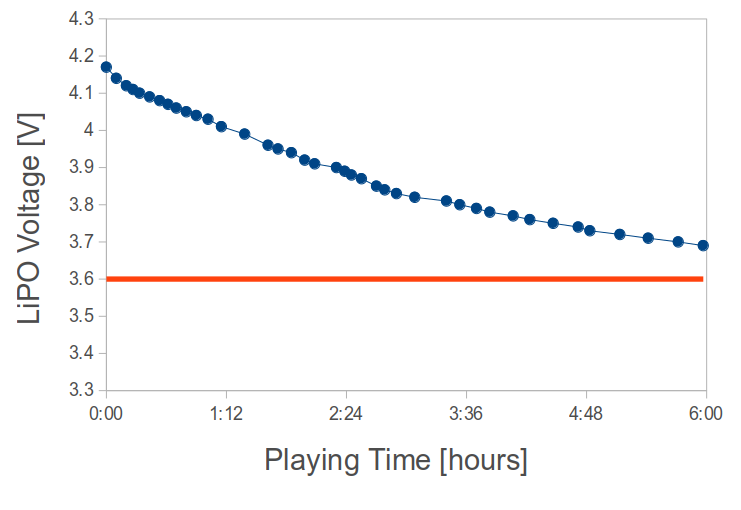 LiPO battery voltage vs. time. Playing time beyond 6 hours. Well beyond my attention span.
Switches
3 position navigation switches just made sense here. Nice feel to them, easy to wire up and work with & form factor was right.
 Switch works well for navigate and select
Layout
Believe it or not, this is one circuit layout I actually thought about & planned a little bit. Screen, DSP/codec + audio jacks, micro, buttons, battery charger & usb input, lipo battery and SD card were the real estate hogs. And I wanted it really small and thin. Here are the initial sketches I made to try to figure out nominally where stuff should go -
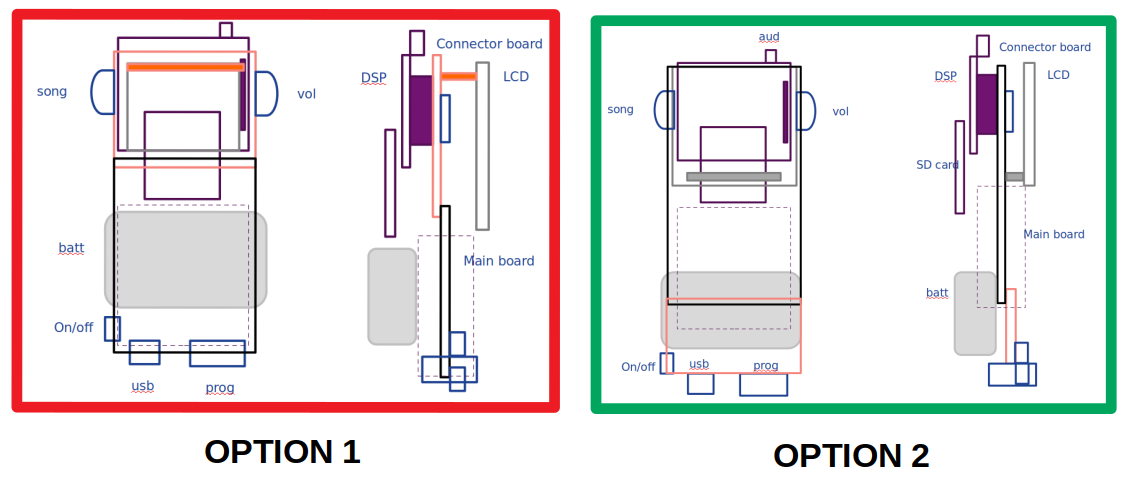 Played around with a few ideas. End result was closer to door #2.
Hardware pictures
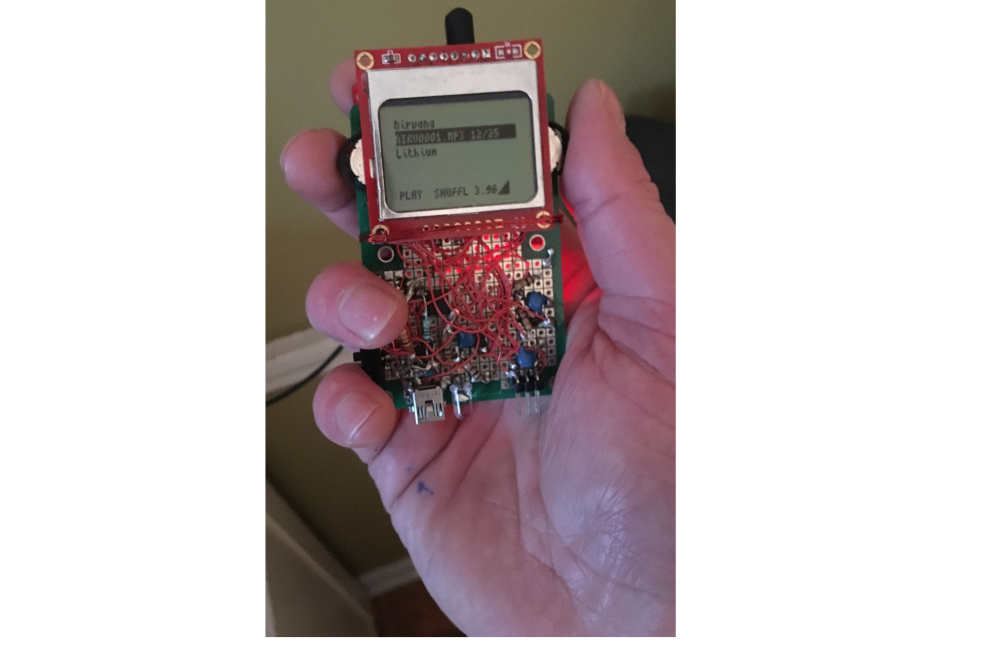
Here are a few pics of the final pcb build
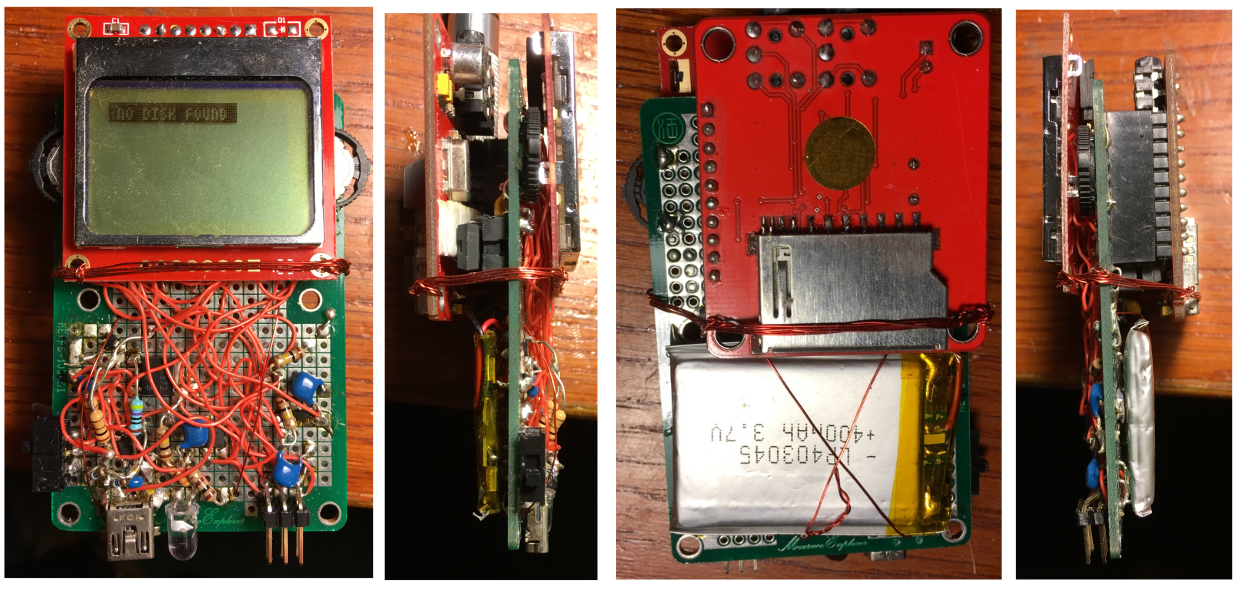 Small, thin & compact
Packaging & Skin - dollar tree foam board
I wanted a quick and dirty way to protect the whole thing. Nothing beats foam board to get the job done in 30 min or less. Even a little mount to sit on top of an old stereo where we can feed the AUX input with the audio ouput.
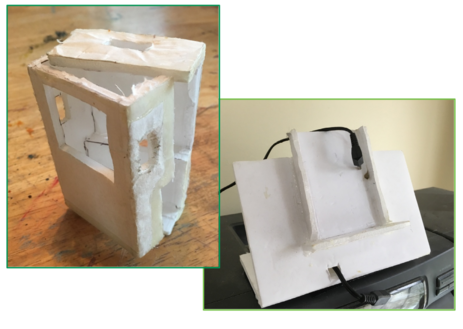 Covering and mounting - dollar tree foam board & hot glue
Software
All of the software is posted in my repository.
Debug strategy & software UART
I’m going to start with this, even though its something I realized I needed halfway through. Clearly, the LCD wouldn’t cut it as both the main screen and a way to debug what was happening. That’s where the serial port comes in. The code for the file system I ended up using (FatFS) included a really lightweight software-defined UART, written in assembler. Meaning all of the timing was done in software. In addition, it included some really low overhead serial print functions - so I went with all of this as my main debug path.
Putting together the pieces one-by-one:
- Get the software UART working - suart.S & suart.h
- learn to work with the xprintf functions - xitoai.S
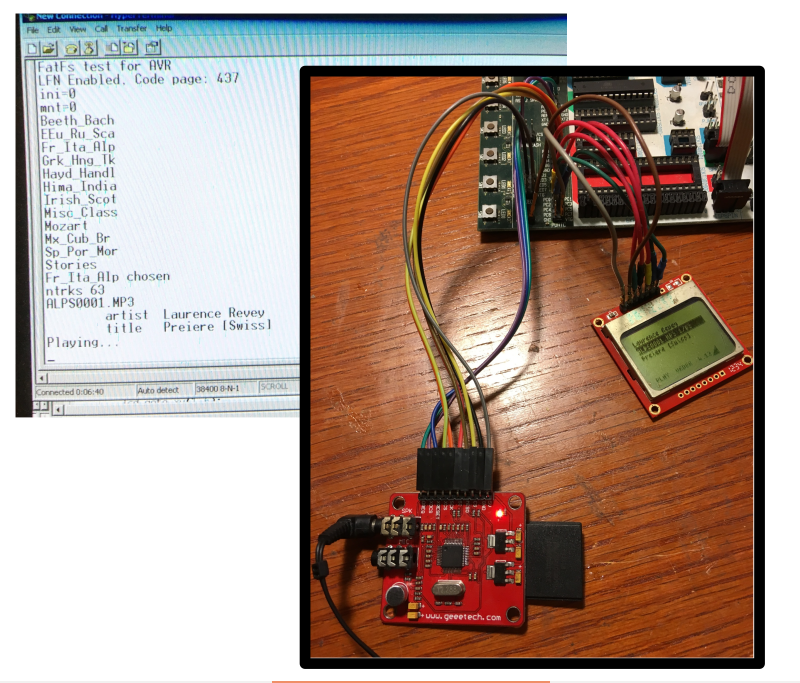 My debug setup: STK500 + a software UART & terminal emulator
User Interface
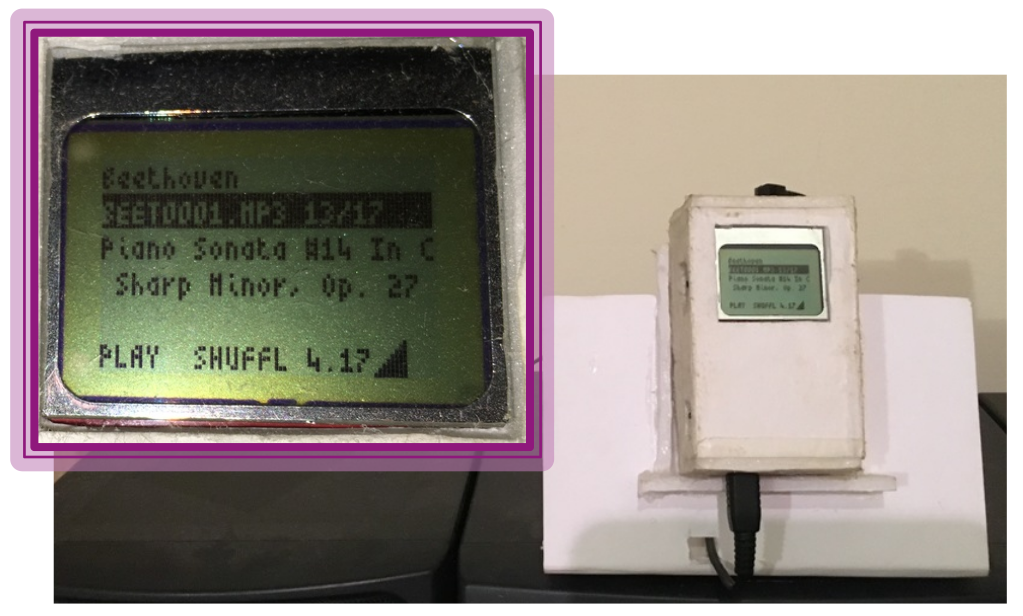
Here is a little video of the MP3 player in action, demonstrating most of the features
The current settings are all displayed on the bottom line of the user interface.
PLAYorPAUSE
ORDERorSHUFFL
Volume level
Voltage on battery
The way the user interacted with this was really important, starting with the response to the pushbuttons.
Input responsiveness
I played with 3 different methods to get a good user response.
- Software polling: The first was just polling every time through the main loop. I’ve learned my lesson on this before. Terrible.
- Pure hardware interrupt: The second was having the press of a button interrupt the processor. OK, in the running.
- Interrupt-driven hardware polling: The third was using a dedicated hardware timer interrupt the processor and use this interrupt to manage any button presses. At first, I thought this would have a really bad impact on the audio, but after fiddling with it for an afternoon I found it was a really flexible way to do things. I never went back to method 2. Winner.
Here’s what you need to do.
You need to experiment with the interrupt timer. You need to include a debouncer to avoid “double clicks”. You need to figure out which button was pressed & ensure it was pressed. You need to use that information to update a state variable that can be managed within the main loop. You need to use this timer for any other things you can think of (like the periodic voltage measurement). Finally, you need to get out of this interrupt service routine as fast as possible.
ISR(TIMER0_COMPA_vect)
{
	pha++;

	if ((pha % (LONG) 20) == 0) {	// 16 times per second

		if (squelched == 1) {
			if (squelch_count < (UINT) 40) {
				squelch_count++;
			}
			else {
				squelch_count = 0;
				squelched = 0;
			}
		}
		if ((NEXT || PREV || PAUSE_PLAY || VOL_UP || VOL_DOWN || MODE) && (squelched == 0)) trapped++;


		if (trapped > (UINT) 5){
			if (NEXT) CmdPlay = K_NEXT;
			if (PREV) CmdPlay = K_PREV;
			if (PAUSE_PLAY) {
				stat = 1;
				if (Playing == 1){
					CmdPlay = K_PAUSE;
					Playing = 0;
				}
				else {
					CmdPlay = K_PLAY;
					Playing = 1;
				}
			}
			if (VOL_UP) CmdVol = K_VOL_UP;
			if (VOL_DOWN) CmdVol = K_VOL_DOWN;
			if (MODE) {
				if (CmdMode == K_RANDOM ){
					CmdMode = K_ORDER;
					if (frozen ==0) {
						lcd_goto_xy(7,6);
						fprintf_P(&lcd_out,PSTR("ORDER "));
					}
				}
				else {
					CmdMode = K_RANDOM;
					if (frozen ==0) {
						lcd_goto_xy(7,6);
						fprintf_P(&lcd_out,PSTR("SHUFFL"));
					}
				}
			}
		trapped = 0;
		squelched = 1;
		}
	}

	if ((pha % (long) 16000) == 0) {
		//single conversion
		ADCSRA |= (1<<ADSC);
		while (ADCSRA & (1<<ADSC));
		MeasuredVoltage = ADC;
		CmdVoltage = 1;
		if ((MeasuredVoltage < 510) && (CountVoltage >0)) CountVoltage = 0;
		if (MeasuredVoltage > 5100) {
			CountVoltage++;
			if (CountVoltage>10) {
				CountVoltage = 10;
				CmdVoltage1 = 1;
			}
		}
	}
}
Navigation
Because all the files are stored on the SD card, I used the SD card directory structure to navigate. Right now, all that’s implemented is one-way - there is no escape back to a higher level directory. When it starts up, you choose this subdirectory. Right now, I have that nested only 1 subdirectory deep. Within a subdirectory, you can play or pause, go forward or backwards in order, or play the entire subdirectory at random. To go back up, you need to cycle power. A maximum of 12 subdirectories are allowed at the highest level.
Volume setting
The volume can be moved up or down, with feedback to the user. I implemented a little bar system in the bottom right corner to see that. The VS1053b has a built in volume control, so this can all be done in software. I chose 8 settings that I thought were across a broad enough range.
if (CmdVol) {


  if (CmdVol == K_VOL_DOWN) {
    if (VolumeIndex == 0) {
      VolumeIndex = 0;
    }
    else {
      VolumeIndex = VolumeIndex -1;
    }

    Volume=(((WORD)VolumeArray[VolumeIndex]<<8)+(WORD)VolumeArray[VolumeIndex]);

    if(Volume>=0x8D8D) Volume=0x8D8D;
    else VS1003B_WriteCMD(0x0b,Volume);

    CmdVol = 0;
  }

  if (CmdVol == K_VOL_UP) {
    if (VolumeIndex ==15) {
      VolumeIndex = 15;
    }
    else{
      VolumeIndex = VolumeIndex +1;
    }

    Volume=(((WORD)VolumeArray[VolumeIndex]<<8)+(WORD)VolumeArray[VolumeIndex]);

    if(Volume<=0x0505) Volume=0x0505;
    else VS1003B_WriteCMD(0x0b,Volume);
    CmdVol = 0;

  }

DisplayVolume(VolumeIndex);
}
Small fonts
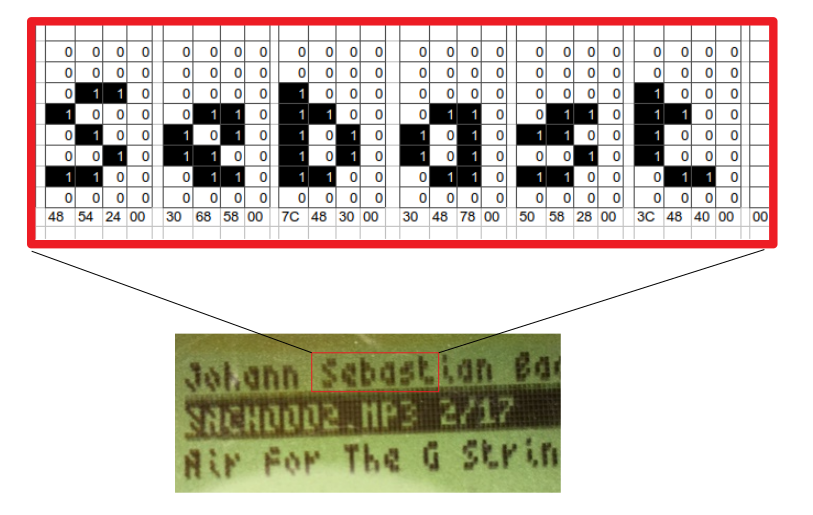 3x5 font for a 3x5(x2) MP3 player
I hadn’t thought about it much before this project, but the ability to support a very small font comes in handy sometimes. I went with it exclusively on this project. Especially helpful to display information about the track as well as a compact listing of the files on the MP3 player. I found a really cool 3x5 font on the web and used it - but only after I had figured out how to translate it into the format I needed to send to the LCD. These projects are full of little puzzles like this:
![]() Universal translator
Universal translator
Embedded file system - FatFS
I had no appreciation for the complexities of dealing with embedded file systems for SD cards. Still barely do. But I realize that Bill Greiman’s SDFat library was powering the Arduino test code. Really cool code, but I wanted something written for many different platforms.
Enter FatFS.
Respect. That’s all I can say about ELM-Chan. Everything he does is awesome. His FatFS file system (among other things). The learning curve is a little steep. But to have a fully featured file system available at my beck and call to deal with SD card read/writes, in an 8-bit microcontroller, was really cool.
I’ll expand on this section at some point, but suffice it to say I probably spent a good 10 hours or so just playing with FatFS, understanding the code, understanding the impact of changes to the configuration file ffconf.h, minimizing the footprint and figuring out how to integrate it into the code base.
Digital signal processing
You don’t really need to think at all about what the actual codec is doing. One command & it’s streaming.
for (UINT i = 0 ; i < 512 ; i++){
  while ((VS1003B_PIN & _BV(VS1003B_DREQ))==0); //wait
  VS1003B_WriteDAT(Buff[i]);
}
But you need to know what you are streaming!
MP3 file parsing
Periodically, I’d find a song that either abruptly ended, didn’t play, or waited a serious amount of time before playing. I had already made enough compromises. I wanted it to be able to play almost all songs on demand, all the time. So I invested time in getting this right. It took some time to learn about the MP3 file structure, because that’s what it all boils down to. I might regurgitate some of the key points, but really this picture from the Wikipedia article is the key:
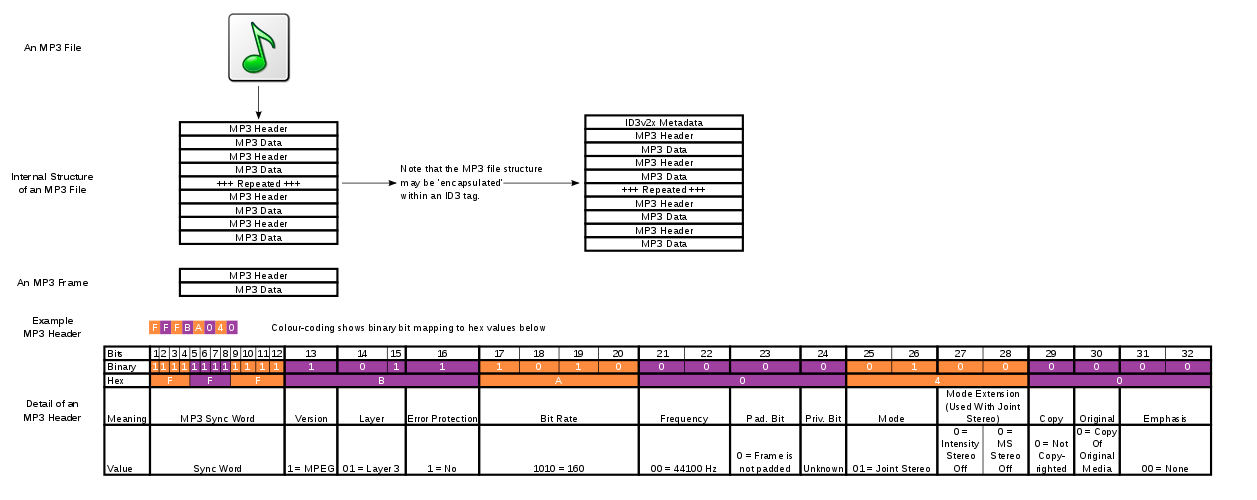 MP3 file spec … FFF-something is the magic code
It tells you the format of a valid MP3 header block, and also how to interpret it. This chunk of code for quickly parsing the header took several iterations to get right:
//try first 500 bytes for traditional MP3 or simple MP3
res = f_read(&fil, Buff, sizeof(Buff), &br);


for (UINT i = 0 ; i < 511 ; i++){
  if ((Buff[i] == 0xFF) && ((Buff[i+1] == 0xFA) ||(Buff[i+1] == 0xFB)||(Buff[i+1] == 0xF3))) {
  Startfound = 1;
  res = f_lseek(&fil, f_tell(&fil) - i);
  goto SF;
  }
}

SF:	if (Startfound ==0) res = f_lseek(&fil, 0);

while ((!cmd) && (!Startfound)) {
  res = f_read(&fil, Buff, sizeof(Buff), &br);
  Readcount++;
  if (Readcount < 90) {
    if (Zerocount > 100) {
      for (UINT i = 0 ; i < 511 ; i++){
        if ((Buff[i] == 0xFF) && ((Buff[i+1] == 0xFA) ||(Buff[i+1] == 0xFB)||(Buff[i+1] == 0xF3))) {
          Startfound = 1;
          res = f_lseek(&fil, f_tell(&fil) - i);
          goto GC;
        }
      }
    }
    else {
      for (UINT i = 0 ; i < 509 ; i++){
        if (Buff[i] == 0x00){
          if(Buff[i+1] == 0x00) {
            Zerocount++;
          }
          if ((Zerocount > 100) && (Buff[i+2] ==0xFF)){
            if ((Buff[i+3] == 0xFA) ||(Buff[i+3] == 0xFB)) {
              Startfound = 1;
              res = f_lseek(&fil, f_tell(&fil) - i-1);
              goto GC;
            }
          }
          else {
            if ((Zerocount <=100) && ((Buff[i+1]) > 0x00)) Zerocount = 0;
          }
        }
      }
    }
  }
  else { //readcount > 40, go to more sophisticated search
    if ((SkipCount == 1) && (!(Buff[0] == 0))) {
      res = f_lseek(&fil, f_tell(&fil) +4096); //4096 assumes there are LOTS of buffered zeros in these long headers
      goto GC;
    }
    if (SkipCount ==0) {
      for (UINT i = 0 ; i < 511 ; i++){
        if ((Buff[i] == 0xFF) && ((Buff[i+1] == 0xFA) ||(Buff[i+1] == 0xFB)||(Buff[i+1] == 0xF3))) {
          Startfound = 1;
          res = f_lseek(&fil, f_tell(&fil) - i);
          goto GC;
        }
      }
    }
    if ((SkipCount ==1) && (Buff[0] ==0)) {
      AllZeros = 1;
      for (UINT i = 0 ; i < 10 ; i++){
        if ((!(Buff[5*i] ==0)) && (AllZeros = 1)) {
          AllZeros = 0;
        }
      }
      if (AllZeros ==1){
        AllZeros = 0;
        SkipCount = 0;
        goto GC;
      }
    }
  }
}
If you are going to do any work on these files, a hex editor and an MP3 ID3 tag editor are pretty useful tools.
Getting the song names: ID3 tags
The other thing I incorporated was a piece of code to find the artist and title of the song from the ID3 tags, which are pieces of information inside the MP3 file. You can use an ID3 editor to change or add them if they are missing.
If they exist, they are written to the screen during the song.
strcpy_P(info_id3v2v3.artist, PSTR("Unknown Artist"));
id3_read_status = read_ID3_info(ARTIST_ID3,info_id3v2v3.artist,sizeof(info_id3v2v3.artist),&fil);
xout("artist", info_id3v2v3.artist, sizeof(info_id3v2v3.artist));
lcd_goto_xy(1,1);
fprintf_P(&lcd_out,PSTR("%s"), info_id3v2v3.artist);


strcpy_P(info_id3v2v3.title, PSTR("Unknown Title"));
id3_read_status = read_ID3_info(TITLE_ID3,info_id3v2v3.title,sizeof(info_id3v2v3.title),&fil);
xout("title", info_id3v2v3.title, sizeof(info_id3v2v3.title));
lcd_goto_xy(1,3);
fprintf_P(&lcd_out,PSTR("%s"), info_id3v2v3.title);
SPI bus
First thing to know is that the codec has separate SPI enable lines for sending/receiving data (VS1053b_XDCS) or sending/receiving commands (VS1053b_XCS). The SD card has its own chip select line (SD_CS). Second is that for data and commands, the codec and the SD card share the SPI bus I/O lines (MISO/MOSI). Third, the codec has a special line in streaming mode which strobes if its buffer is full (VS1053b_DREQ) to limit further writing. The VS1053b code is in VS1003B.c and the SD card code is in mmcbb.c.
Some examples-
Send a command to SD card over SPI:
static BYTE send_cmd (		// Returns command response (bit7==1:Send failed)
	BYTE cmd,		// Command byte
	DWORD arg		// Argument
)
{
	BYTE n, res;


	if (cmd & 0x80) {	// ACMD<n> is the command sequense of CMD55-CMD<n>
		cmd &= 0x7F;
		res = send_cmd(CMD55, 0);
		if (res > 1) return res;
	}

	// Select the card and wait for ready
	deselect();
	if (!select()) return 0xFF;

	// Send command packet
	xmit_spi(0x40 | cmd);				// Start + Command index
	xmit_spi((BYTE)(arg >> 24));		// Argument[31..24]
	xmit_spi((BYTE)(arg >> 16));		// Argument[23..16]
	xmit_spi((BYTE)(arg >> 8));			// Argument[15..8]
	xmit_spi((BYTE)arg);				// Argument[7..0]
	n = 0x01;							// Dummy CRC + Stop
	if (cmd == CMD0) n = 0x95;			// Valid CRC for CMD0(0)
	if (cmd == CMD8) n = 0x87;			// Valid CRC for CMD8(0x1AA)
	xmit_spi(n);

	// Receive command response
	if (cmd == CMD12) rcv_spi();		// Skip a stuff byte when stop reading
	n = 10;								// Wait for a valid response in timeout of 10 attempts
	do
		res = rcv_spi();
	while ((res & 0x80) && --n);

	return res;			// Return with the response value
}
Writing a command to codec over SPI:
//config register
void VS1003B_WriteCMD(uint8_t addr, uint16_t dat)
{
	VS1003B_XDCS_H();
	VS1003B_XCS_L();
	VS1003B_WriteByte(0x02);
	VS1003B_WriteByte(addr);
	VS1003B_WriteByte(dat>>8);
	VS1003B_WriteByte(dat);
	VS1003B_XCS_H();
}
Writing data to codec over SPI:
//write data (music data)
void VS1003B_WriteDAT(uint8_t dat)
{
	VS1003B_XCS_H();
	VS1003B_XDCS_L();
	VS1003B_WriteByte(dat);
	VS1003B_XDCS_H();
	VS1003B_XCS_H();
}
In turn, each of these is calling byte-level read and write functions like VS1003B_WriteByte and xmit_spi, which look like this:
//send an SPI byte
static BYTE xmit_spi(BYTE val)
{
	SPDR = val;
	while(!(SPSR & _BV(SPIF)));
	return SPDR;
}
Organizing songs, ordering them alphabetically
In order to ensure everything works, there are a few rules that have to be followed. I’ll go through them one by one just so I have them written down, and that will make it easier for me to (eventually) address them.
-
The songs are played out in order they appear in the SD card file allocation table. So first order them by using some sort of numbering scheme. Then when transferring to the SD card from windows, order them in the windows folder, then drag them to the SD card by selecting all, then right clicking on the first file & then copy paste. This somehow preserves order independent of file time stamp.
-
For simplicity, use
YYYYYXXX.mp3song naming scheme. YYYYY is the name, XXX is a number. -
Keep the folder names to 10 characters or less, and have 12 folders or less
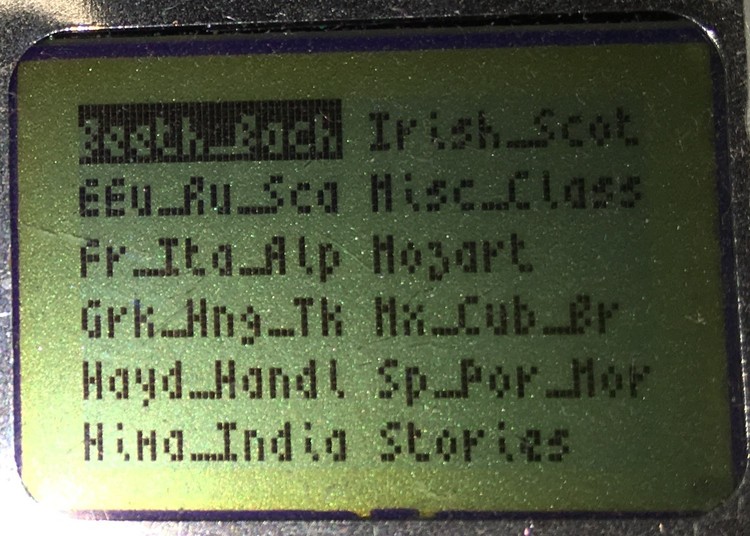 Folder names of 10 characters or less
Random function
I implemented a random shuffle function. It first figures out the number of tracks of the current type and then randomly chooses between them.
a_rand = (DWORD) 29223;
m_rand = (DWORD) 131071;
seed_rand = (DWORD) 0;

if(CmdMode==K_RANDOM) {//if the mode is shuffle the songs
  if (seed_rand ==0) {
    init_seed = (WORD) TCNT1;
    seed_rand = (DWORD) init_seed;
  }
  seed_rand = (a_rand * seed_rand) % m_rand;
  rand_val = ((DWORD) ntrks*seed_rand)/m_rand;
  rand_song = (UINT) rand_val +1;
}
Learn by re-doing
Binary mode of FTP
Ok, so this is really stupid. But I was sending a bunch of audio files from a PC to a Mac over our home network using ftp. Why? don’t ask. So I started playing them on my player and it was filled with all these snap, crackle, pops. Are you kidding me? So I spent about 2 days testing every component on the board, all kinds of test software, etc.., etc.. Nothing. Didn’t think to test the files themselves. Of course, turns out that ftp sends files in ascii by default. I actually knew that but on this batch forgot to switch to binary. Awesome.
Buffer sizes & overflows
In order to get the smoothest playback possible, it was important to send the DSP the largest chunk of mp3 I could to playback at any given time. We’re dealing with an 8-bit micro here, folks, with 2KB of SRAM, so even a 500 byte buffer is large. I ended up overflowing the stack on multiple occasions, which is a hard thing to debug if you aren’t aware of it.
Limitations
So here, in one spot, is a list of all the current limitations. All of them have to do with the software.
- doesn’t show total play time & current played amount of current track
- doesn’t allow flexible navigation, especially back out of a subdirectory
- doesn’t scroll the name of the track or author if longer than 23 characters
- doesn’t allow flexibility in play mode - e.g. no “total random” mode
- wouldn’t easily show more than 12 subdirectories - they need to be structured
- titles of subdirectories can’t be more than 12 characters
I might tackle these one-by-one. But first I’ll probably build up another one. Or not.